Firm Feel Products

LSM360

Well-Known Member
Joined
Nov 28, 2011
Messages
824
Reaction score
320
Location
Melbourne, Florida
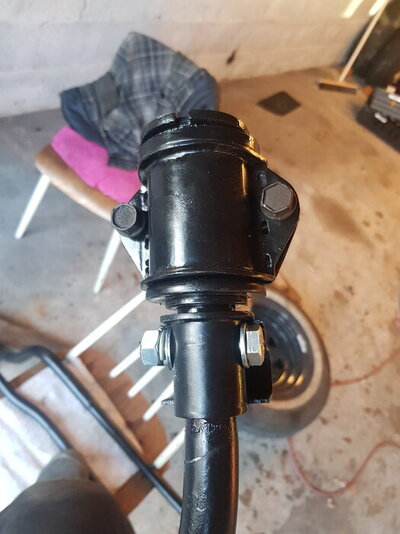
I got an email that my t-bars had been delivered while on shift last night so I swung by and secured them but really didn't have time to open them up and drool. So for now this is the only pic I have lol.

IMG_0635.jpeg
 

Justwondering

Well-Known Member
Joined
Aug 7, 2015
Messages
3,615
Reaction score
1,015
Location
North Texas
so exciting ...
you say thats whats in the brown box, but we all know what you reallllllly ordered, that gets delivered in a plain brown wrapper....
....
....
....
Ginormous chocolate bar?

lordy ... I need to stop this caffeine...

JW
 

LSM360

Well-Known Member
Joined
Nov 28, 2011
Messages
824
Reaction score
320
Location
Melbourne, Florida
so exciting ...
you say thats whats in the brown box, but we all know what you reallllllly ordered, that gets delivered in a plain brown wrapper....
....
....
....
Ginormous chocolate bar?

lordy ... I need to stop this caffeine...

JW
Hahaha I'm not sure which I'd enjoy more.....t-bars or chocolate bar!
 

LSM360

Well-Known Member
Joined
Nov 28, 2011
Messages
824
Reaction score
320
Location
Melbourne, Florida
Does anyone know of a youtube video that's a good instructive video on the installation of transverse t-bars? Or even a nice writeup? Thinking M_Body_Coupe, Aspen500, and Duke5A are smarties and might know :)

What's the level of difficulty would you say?

P.S. Just remembered my FSM might be very helpful too
 
Last edited:

Duke5A

Well-Known Member
Joined
Apr 6, 2018
Messages
1,661
Reaction score
877
Location
Michigan
Putting bars in is a pretty straight forward install.

REMOVAL
1) with the car on the ground unbolts the sway end links
2) crack lugs lose
3) put it up in the air with the jack stands under the frame rails
4) wheels off
5) measure how long the adjustment bolts are run in
6) use an impact wrench and remove the height adjustment bolts all the way out
7) unbolt t bars from lower control arms
8) unbolt pivot bushing brackets
9) remove bars

BAR PREP
1) The factory pivot bushings will need to be drilled. There are four spot welds holding the shell together. Pretty easy.
2) Throw away the old bottom plate
3) drill and tap pivot shell for zirc fitting
4) slip on new pivot bushings and make sure they're oriented correctly so the hole lines of with the zirc fitting
5) install shell. Those plates in the box go under the pivot bushing.
6) Grease up the hex ends of the bars good before putting the adjustment anchors and boots in place
7) The adjustment anchors needs to clocked correctly on the hex end. You can reference how they come off the old bars for the correct orientation.

What I haven't covered is replacement of the end bushing that attach the bars to the lower control arms. Have you ever replaced these before? In the photos I see you have new bushings, but you will need to reuse the factory bushing shells. This is going to be the hardest the part of this entire swap. To pull the bushings off of the old bars involves cutting off a sheer pin and driving it out with a punch. To get the shells apart, I can't help you with this as I have never done it. When I did this you could still get the Moog end bushings brand new that included the shell. I'm sure someone here has done this. It ain't easy.

INSTALLATION
1) start with getting the adjustment anchors back in place in the K and then run the bolts in on the pivot bushing shell
2) keep it loose until you get the bolts on the lower control arm in place. It's normal to have to tweak the lower control arm a little into the correct position to start the bolts.
3) Tighten it all up
4) Use a grease gun and get grease into those bushings
5) install adjustment bolts
6) run down adjustment bolts until the length of the bolt protruding matches the measurement you took before assembly
7) wheels on
8) car on ground
9) bounce the car a little each corner to settle the suspension
10) bolt the sway bar back up

- You're probably going to have to adjust the ride height when this is done. Measure how far the adjustment bolts are threaded in is only going to ballpark this since the bars are new.

I'm probably leaving something out. I did this ten years ago. Hit me up with any questions.

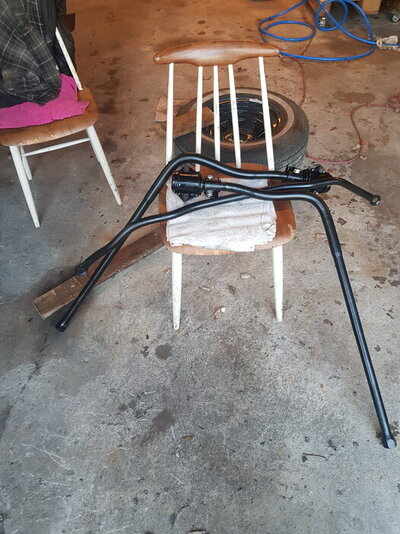
Here is a photo of my bars assembled with the new pieces before I put it back in.

2013-07-11_19-05-22_682.jpg

Does anyone know of a youtube video that's a good instructive video on the installation of transverse t-bars? Or even a nice writeup? Thinking M_Body_Coupe, Aspen500, and Duke5A are smarties and might know :)

What's the level of difficulty would you say?

P.S. Just remembered my FSM might be very helpful too
 

Lightning II

Well-Known Member
Joined
Sep 24, 2020
Messages
183
Reaction score
80
Location
Augusta, GA
I have a stupid question that I've always wondered: does the hex end of the FMJ torsion bar match up with the typical A/B/C/E sizing?
 

Sub03

Well-Known Member
Joined
Apr 5, 2020
Messages
140
Reaction score
90
Location
Norway
I found a lot of good info on dippy.org when I did mine.

Suspension: Torsion Bars

Like Duke said the hardest part for was getting the control arm end piece separated from the torsion bar. After removing the pin the end piece were rusted solid to the bar. Had to get creative with a hydraulic press to break them loose.
The end bushing shells was a bit tricky to separate without destroying them. I used a small grinder and a punch to break the spot welds. They got a little deformed in the process, but I managed to straighten them out in a bench vise.

Unfortunately I forgot to take pictures while I did it, only got some after job was done. :rolleyes:

20200506_203041.jpg20200506_202654.jpg


Attached an article with some pictures, see #11, 12(it says stabilizer bar, but that is the pivot bushing) and 24-28.
 

Attachments

  • Forstilling.pdf
    3 MB · Views: 122

LSM360

Well-Known Member
Joined
Nov 28, 2011
Messages
824
Reaction score
320
Location
Melbourne, Florida
My AHB has always been a very dry car but I'll still spray the parts with PB Blaster tomorrow and hopefully that helps.
 

M_Body_Coupe

Well-Known Member
Joined
Aug 19, 2013
Messages
626
Reaction score
296
Location
Windsor, ON, Canada
Big beefy bars and new urethane and plates

View attachment 49922

...

Well, I picked mine up today from my friend's. Happy than a pig in shit for sure...but I got them home, placed them down on the floor and noticed that they are...ASSYMETRICAL!

Clearly I have never realized this before, and I always thought they were the same thing. Heck I could swear I never noticed them to be different in the past. Maybe I was lucky to always grab the right bar for the side of the car...or.....do I have a problem here???

Take a look at these, a couple of shots to just compare them...clearly the curve is different on the LCA part of the bar, otherwise they pretty much match up to just past the 90-deg bend.

tbar1.jpg


tbar2.jpg


EDIT
====

Never mind...a quick search revealed that they are in fact different: specific L(eft) and R(ight) sides!
 
Last edited:

Duke5A

Well-Known Member
Joined
Apr 6, 2018
Messages
1,661
Reaction score
877
Location
Michigan
Yeah, there is an L and R stamped on the hex end of the bars. They couldn't be symmetrical. One bar sits in front of the other on the K and would need to be longer to reach the LCA.
 

Remow2112

Well-Known Member
Joined
Mar 10, 2011
Messages
154
Reaction score
38
Hardest thing I ever did on my Volare was the t-bar bushing end. Drilling out the spot welds didn't work for me. But getting that end off the torsion bar was a major PITA!


Those look fantastic!
 
Last edited:

Justwondering

Well-Known Member
Joined
Aug 7, 2015
Messages
3,615
Reaction score
1,015
Location
North Texas
Nearly relevant comment coming::::

I took my 5th avenue to a local shop to have them check the alignment after I first got it.

I made sure I left the manual, with a bookmark, on the front seat and reminded them that it was there in case they had any questions on how to do a front end alignment on a 87 fifth avenue.

Got a call that afternoon to come check with them.

Guy proceeds to tell me that frame is tweaked. I'll need to get the frame straightened before they will do the alignment.

I asked him to show me the problem.

Seems that when you have the car on the hoist and stand under it looking at all the undercarriage bars, joints, connections.... it is clearly not symmetrical.

I asked him if he looked at the the book. He says, didn't have to, been doing this for several years and the owner also said it was an issue.

I had them put the car on the ground, got the manual, opened the book, and showed him the damn picture. Not symmetrical. He then says he's never worked on a something that old before. SAY WHHHHAAAAUUUUT?

Got my keys and left. Told him I wasn't paying anything for ignorance. Never went back.

Frame was fine. And the next alignment shop I checked with was overjoyed to work on a car that reminded him of his dad's old car.

JW
 

M_Body_Coupe

Well-Known Member
Joined
Aug 19, 2013
Messages
626
Reaction score
296
Location
Windsor, ON, Canada
Yeah, there is an L and R stamped on the hex end of the bars. They couldn't be symmetrical. One bar sits in front of the other on the K and would need to be longer to reach the LCA.
Oh, yours had that?

Nothing on either one of my bars...no 'L', no 'R' either...
 

Duke5A

Well-Known Member
Joined
Apr 6, 2018
Messages
1,661
Reaction score
877
Location
Michigan
Oh, yours had that?

Nothing on either one of my bars...no 'L', no 'R' either...

Mine did at least, yeah. That was eight years ago though. The longer bar is going to be the one furthest towards the front of the car.
 

LSM360

Well-Known Member
Joined
Nov 28, 2011
Messages
824
Reaction score
320
Location
Melbourne, Florida
Okay drilled and removed pin how does this come off again (second picture)? Do you put a bolt through here now? Thanks!!!

imagejpeg_0.jpeg


imagejpeg_0 (1).jpeg
 
Back
Top